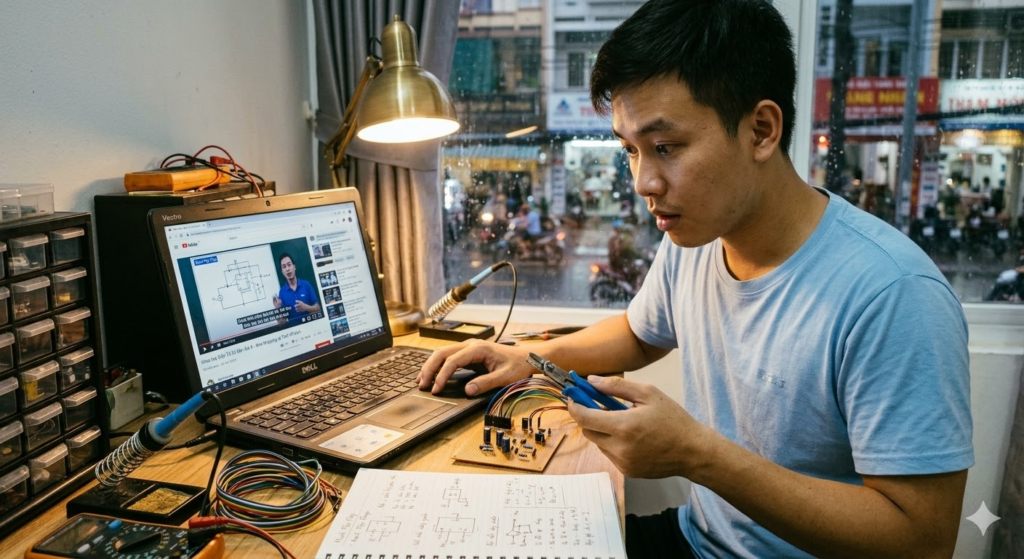
This is an post about my Maker hobby, not related much to Software Building or Management.
I first saw a wire wrap tool while taking the Udemy course Crash Course Electronics and PCB Design. [R1] My first reaction was honestly: wait… what is this thing, and why did I never see it in Vietnam when I was growing up? I had seen soldering irons, breadboards, perfboards, all the normal beginner-electronics tools. But this one felt like a quiet old engineering trick that somehow never entered my orbit.
TL;DR
After the course, I checked Shopee and found that yes, it is sold in Vietnam, but usually shipped from China and with very few sales. That made it even more fascinating to me. Personal observation only, not a market study. When I finally bought one and tried it, the connection felt much stronger than I expected, and the best part was that I could still remove and redo it. For a maker brain like mine, that is a very attractive middle ground between a loose breadboard and a more final solder joint. [R2][R3][R4][R5][R6]
The First Time I Saw It
In the course, the tool was presented as a practical way to make point-to-point connections without immediately reaching for solder. [R1] That stayed with me because in Vietnam I had never seen anyone around me mention it. Not in school, not in hobby circles, not in random electronics conversations. It felt like one of those tools that existed in another engineering universe and only became visible once somebody deliberately pointed at it.
Why It Stayed With Me
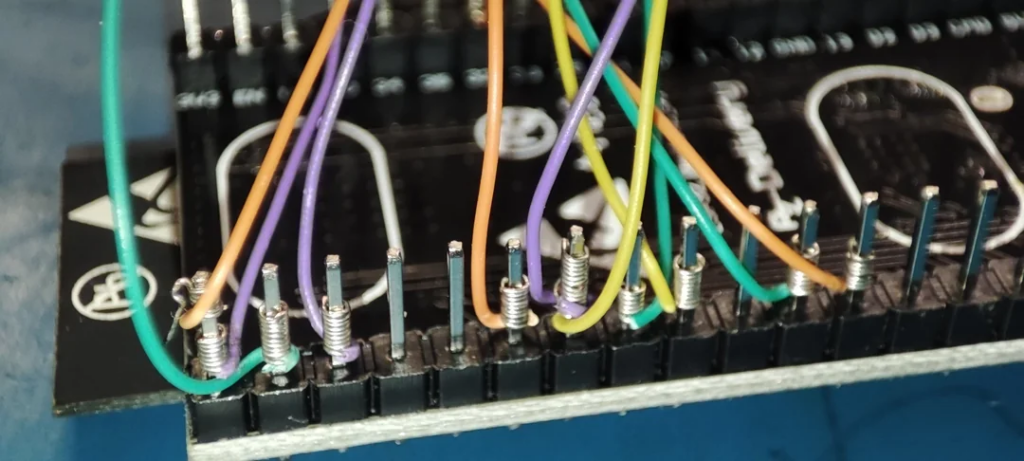
The wrapped connection works by twisting stripped solid wire around a square post under tension, which is also why dedicated wrapping and unwrapping tools exist in the first place. [R2][R3][R4][R5][R6] In practice, what I loved was the feeling of making a neat connection, testing an idea, and then changing it without feeling like I had committed too early. I have used it on some of my own small projects since then, and every time I do, I get the same reaction: this tool deserves more love.
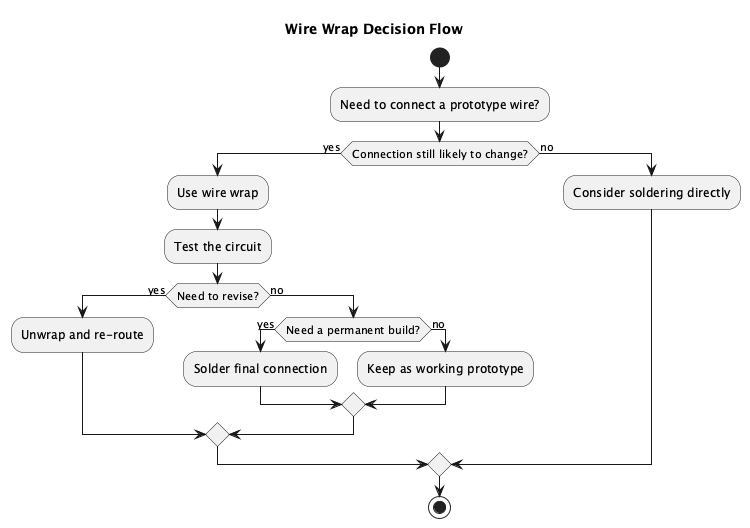
PlantUML Diagram: Wire Wrap Decision Flow
Where I Think It Actually Makes Sense
| Situation | Why I would use wire wrap |
|---|---|
| Quick circuit experiments | Easier to revise than soldering while I am still thinking |
| Through-hole prototype wiring | Good for point-to-point links on posts or headers [R2][R3] |
| Neater temporary builds | Looks more organized than I expected on small builds [R2][R5] |
| Pre-solder validation | Useful when I want to test a layout before making it permanent |
| Small low-current builds | Better matched to light-duty signal work than power-heavy use [R2][R6] |
| Educational demos | Lets me show a connection method that is visible and reversible |
The first use case is simple: early-stage experiments. When I am still asking whether a circuit idea even makes sense, wire wrap feels more honest than soldering everything too early. It keeps me in learning mode.
The second use case is through-hole prototype wiring, especially around square posts or header pins. That is where the method starts to feel elegant rather than gimmicky. [R2][R3][R6] The connections are easier to inspect, and the build can look cleaner than a rushed bundle of soldered wires.
The third use case is the one I care about most: pre-solder validation. Sometimes the smart choice is not wire wrap instead of soldering. It is wire wrap first, prove the layout, then solder later when the prototype has earned that commitment. That is why I wanted the first diagram to show both endings.
And finally, I think it has teaching value. In Vietnam, many beginners move from breadboard straight to soldering. That works, of course. But a tool like this reminds me that engineering also has in-between methods. For me, discovering that was part of the fun.
https://www.reddit.com/r/AskElectronics/comments/10c2vfw/first_time_wire_wrapping_this_is_going_inside_a/
My Honest Take
The tool was not cheap by casual-hobby standards for me in Vietnam, so buying it did feel a bit indulgent. But I do not regret it. It fits my DIY side very well because I like tools that sit between idea and commitment. A breadboard is fast but loose. Soldering is strong but less forgiving. Wire wrap lives in that interesting middle zone: stronger than it looks, removable when needed, and surprisingly satisfying to use. It will not replace soldering for everything, of course. But for learning, prototyping, and certain repairs or layout experiments, I think it is underrated.
PlantUML Diagram: Wire Wrap Maker Workflow

And maybe that is the bigger reason I wanted to keep this post. The wire wrap tool reminded me that the maker world is full of small, half-forgotten tools that can still surprise you. If you grew up in Vietnam like me and never saw one before, same here. That is exactly why it felt worth writing down.
References
[R1] LaMothe, A. (n.d.). Crash course electronics and PCB design. Udemy. https://www.udemy.com/course/crash-course-electronics-and-pcb-design/
[R2] SparkFun Electronics. (n.d.). Working with wire: How to use a wire wrap tool. https://learn.sparkfun.com/tutorials/working-with-wire/how-to-use-a-wire-wrap-tool
[R3] Jonard Tools. (n.d.). JIC-22681 hand wrapping tool. https://jonard.com/jic-22681-hand-wrapping-tool
[R4] Jonard Tools. (n.d.). Hand wire wrapping and unwrapping tools. https://jonard.com/node/1115
[R5] Jonard Tools. (n.d.). Wrap-strip-unwrap tool. https://jonard.com/hand-wrap-tool-wsu-tool
[R6] DigiKey TechForum. (2024, April 10). Use wire wrap techniques for secure wire to PCB connections. https://forum.digikey.com/t/use-wire-wrap-techniques-for-secure-wire-to-pcb-connections/40290
Related Maker Reading
If this post speaks to the part of you that likes tools, prototypes, and strange little hands-on discoveries, these are the closest posts in the same spirit.
- Unboxing the Bambu Lab P1S Combo: Affordable 3D Printing Excellence
- The Intersecting Journey of Physical Product Design and Product Management
- Buzz Wire DIY: A Journey of Sparks, Laughter, and Team Spirit
- DIY 101: Building Your Own Radio
Image Disclosure
Some images used in this post were created with AI. They may appear realistic, but they do not depict real scenes or real photographs unless explicitly stated otherwise. When a realistic image of me is an actual photograph, the caption will clearly note that it is a real image.

这个不是工具介绍而已,更像文化观察。